1. はじめに
UE5でマルチプレイを試してみようと思って、GameLiftにデプロイして動かすまでをまとめてみました。
GameLiftのdocumenet
Amazon GameLift をアンリアルエンジンのゲームサーバープロジェクトに追加する - アマゾン GameLift
2. UE5セットアップ
UE5のVersionは最新のリリースブランチの5.1で試してみました。
UE5インストール
- 以下からエンジンのソースコードをinstall
git clone -b 5.1 https://github.com/EpicGames/UnrealEngine.git
セットアップ
エンジンコードがインストールできたら、以下を実行(Windows想定)
Setup.bat
環境したら、以下も実行してSolutionファイルを作成
GenerateProjectFiles.bat
プロジェクト内にUE5.slnが作成されていると思うので、こちらをVisualStudioなどで開く(個人的にRiderが好きなので、Riderで開いてます)

上記slnを開いて、ビルドを実行。
ビルド完了したら、Sampleのプロジェクトを作成して、起動まで確認して一旦以上。
3. GameLift SDKセットアップ
以下のURLから
http://aws.amazon.com/gamelift/getting-started
GameLift Managed Servers SDK
のダウンロードリンクを押す。
SDKビルド
commandで以下まで移動する
GameLift_06_03_2021\GameLift-SDK-Release-4.0.2\GameLift-Cpp-ServerSDK-3.4.2
ドキュメント通り、ビルドコマンドを実行(visual studio 2019でビルドしました)
※パスが長いとエラーになってこける時があったので、注意
mkdir out
cd out
cmake -G "Visual Studio 16 2019" -A x64 -DBUILD_FOR_UNREAL=1 ..
msbuild ALL_BUILD.vcxproj /p:Configuration=Release
ビルドに成功したら、
out\prefix\bin\aws-cpp-sdk-gamelift-server.dll
out\prefix\lib\aws-cpp-sdk-gamelift-server.lib
上記ファイルを以下に配置
GameLift-SDK-Release-4.0.2\GameLift-Unreal-plugin-3.4.0\GameLiftServerSDK\ThirdParty\GameLiftServerSDK\Win64
Linuxサーバーで稼働したかったので、以下も実行
rm -r out
mkdir out
cd out
cmake -DBUILD_FOR_UNREAL=1 ..
make
out/prefix/lib/libaws-cpp-sdk-gamelift-server.so
上記ファイルを以下に配置
GameLift-SDK-Release-4.0.2\GameLift-Unreal-plugin-3.4.0\GameLiftServerSDK\ThirdParty\GameLiftServerSDK\Linux\x86_64-unknown-linux-gnu\
ビルドは以上になります。
PluginにSDK追加
UE5セットアップで作成したプロジェクトで、Pluginsフォルダを作成して、GameLiftServerSDK を配置します。

プロジェクトのslnファイルからVisualStuio(or Rider)を起動。
ビルドして、UEEdiorを開いて、プラグイン の設定を開きます。

GameLiftServerSDK の項目がでてくるので、チェックを入れて再起動。
再度ビルドするかどうか聞かれるので、ビルドして再起動して一度閉じる。
さらに{プロジェクト名}.Build.cs にモジュールとして GameLiftServerSDK を 追加
    public MultiSample(ReadOnlyTargetRules Target) : base(Target)
    {
        PCHUsage = PCHUsageMode.UseExplicitOrSharedPCHs;

        PublicDependencyModuleNames.AddRange(new string[] { "Core", "CoreUObject", "Engine", "InputCore", "HeadMountedDisplay", "EnhancedInput", "GameLiftServerSDK" });
    }
4. ローカルでGameLIftのテスト
ここまでで、SDKの導入まで完了したので、ローカルでGameLiftに接続できるかどうか確認します。
ローカルでGameLIftを起動
3. GameLift SDKセットアップ にてダウンロードしたSDK内の GameLiftLocal-1.0.5 までCommandで移動します。
そこで以下のコマンドをたたきます。
java -jar GameLiftLocal.jar -p 9080

上記でGameLiftのローカルサーバーが立ち上がりました。
UE5とGameLiftをローカルで接続
エディタを開き、GameLiftのSDKの初期化処理を追加します。
GameInstanceの初期化処理で追加しました。
void UCPP_GameInstance::Init()
{
    // GameLift初期化
    if (!GameLiftServer)
    {
        GameLiftServer = NewObject(this);
        GameLiftServer->Init();
    }

    Super::Init();
}
void UGameLiftServer::Init()
{
    //Let's run this code only if GAMELIFT is enabled. Only with Server targets!
#if WITH_GAMELIFT

    //Getting the module first.
    FGameLiftServerSDKModule* gameLiftSdkModule = &FModuleManager::LoadModuleChecked(FName("GameLiftServerSDK"));

    //InitSDK establishes a local connection with GameLift's agent to enable communication.
    gameLiftSdkModule->InitSDK();

    //Respond to new game session activation request. GameLift sends activation request
    //to the game server along with a game session object containing game properties
    //and other settings. Once the game server is ready to receive player connections,
    //invoke GameLiftServerAPI.ActivateGameSession()
    auto onGameSession = [=](Aws::GameLift::Server::Model::GameSession gameSession)
    {
        gameLiftSdkModule->ActivateGameSession();
    };

    FProcessParameters* params = new FProcessParameters();
    params->OnStartGameSession.BindLambda(onGameSession);

    //OnProcessTerminate callback. GameLift invokes this before shutting down the instance
    //that is hosting this game server to give it time to gracefully shut down on its own.
    //In this example, we simply tell GameLift we are indeed going to shut down.
    params->OnTerminate.BindLambda([=](){gameLiftSdkModule->ProcessEnding();});

    //HealthCheck callback. GameLift invokes this callback about every 60 seconds. By default,
    //GameLift API automatically responds 'true'. A game can optionally perform checks on
    //dependencies and such and report status based on this info. If no response is received
    //within 60 seconds, health status is recorded as 'false'.
    //In this example, we're always healthy!
    params->OnHealthCheck.BindLambda([](){return true; });

    //Here, the game server tells GameLift what port it is listening on for incoming player
    //connections. In this example, the port is hardcoded for simplicity. Since active game
    //that are on the same instance must have unique ports, you may want to assign port values
    //from a range, such as:
    //const int32 port = FURL::UrlConfig.DefaultPort;
    //params->port;
    params->port = 17777;

    //Here, the game server tells GameLift what set of files to upload when the game session
    //ends. GameLift uploads everything specified here for the developers to fetch later.
    TArray logfiles;
    logfiles.Add(TEXT("aLogFile.txt"));
    params->logParameters = logfiles;

    //Call ProcessReady to tell GameLift this game server is ready to receive game sessions!
    gameLiftSdkModule->ProcessReady(*params);
#endif
}
params->port = 17777;
は起動するポートに変更してください。
server用のTarget.csを追加します。

Type = TargetType.Server;
TargetTypeをServerに設定します。
上記を追加したら、TargetをDevelopment Serverにしてビルドします。
次にUEエディタを立ち上げて、Serverのパッケージのビルドを行います。

ビルドターゲット を先ほど作成した Target.csと同じして、
プロジェクトをパッケージ化 します。
ビルドが完了すると、指定した場所に
xxxServer.exe という実行ファイルが作成されているので、
こちらショートカットの作成をして、プロパティからログが吐き出されるように設定します。

その後、作成したショートカットを実行すると、ローカルでGameLIftを起動 で立ち上げていたプロセスで接続されていることが確認できると思います。
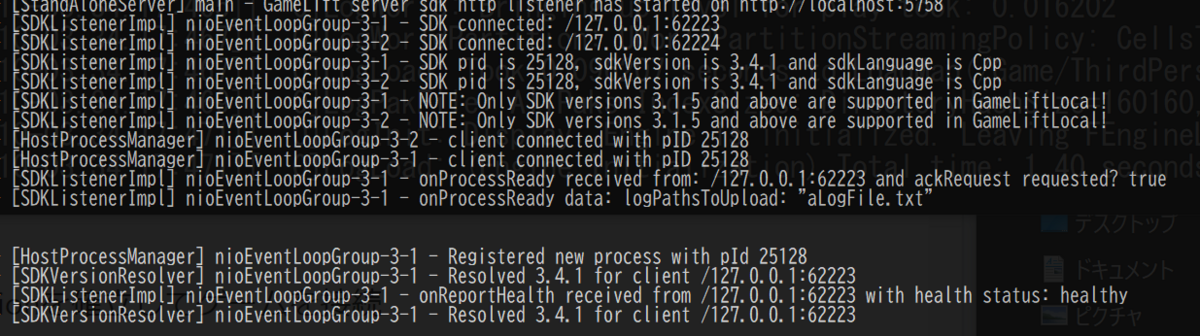
↑のSDKのConnectが出ていれば成功。
2台のクライアントで同じサーバーに接続
次に別のコマンドプロセスで、以下のコマンドを打ち、でGameSessionを設定します。
AWS gamelift describe-game-sessions --endpoint-url http://localhost:9080 --fleet-id fleet-123
さらに、以下のコマンドでGameSessionをアクティブにします。
AWS gamelift create-game-session --endpoint-url http://localhost:9080 --maximum-player-session-count 2 --fleet-id fleet-1a2b3c4d-5e6f-7a8b-9c0d-1e2f3a4b5c6d

上記のように、ローカルのGameLiftの接続が完了していればOK。
次にUEエディタの方でクライアントを立ち上げます。
UEエディタのプレイ設定から、
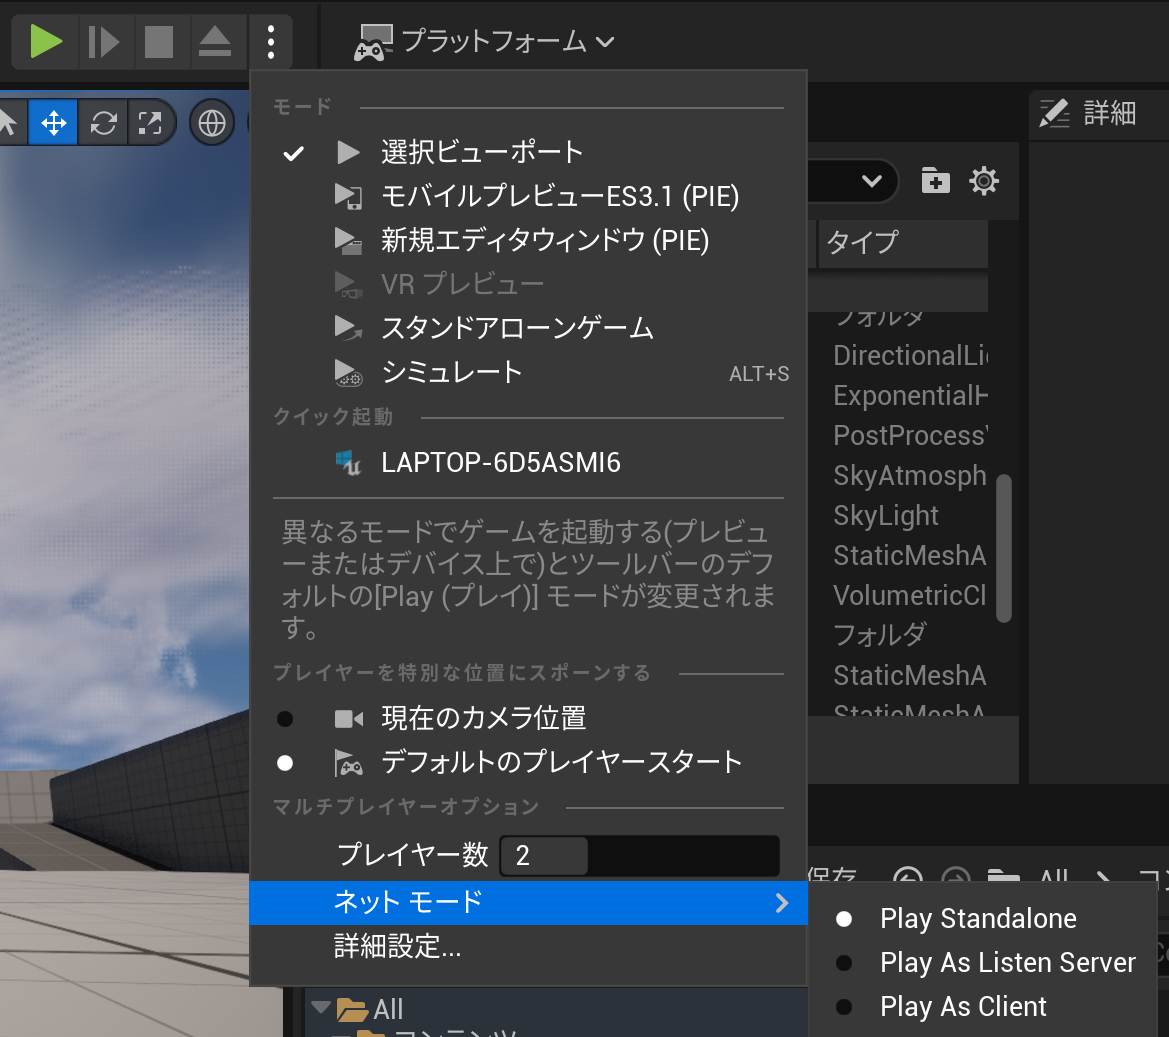
上記の設定でプレイヤー数を2にてプレイします。
起動したら、open 127.0.0.1 を実行して、サーバーに接続できることを確認します。

これで
- GameLift立ち上げ
- ゲームサーバー起動
- ゲームサーバーがGameLiftに接続
- ゲームクライアント2台がゲームサーバーに接続
までをローカルで確認できたかと思います。
実際にAWSのGameLiftにアップロードして、接続するまでを 次にやっていこうと思います。
参考
Amazon GameLift × Unreal Engines 5 でオンラインマルチプレイゲームを作る - ISID テックブログ